Use the measurement tools to take accurate length, area and volume measurements from your drawings. So your measurements read out in real-world units, they're taken against a scale - and Drawboard Projects sets and manages that scale for you at the page level, so you can set it once and then measure freely.
That foundation is the page scale: the scale every measurement on a page is taken against. You set it once and every measurement tool then uses it automatically, with no need to choose a scale each time. This article explains how to take measurements and how the page scale works - setting it, calibrating it and changing it.
Tip: Scale is now set per page, not per measurement. You used to pick a scale from the tool panel every time you measured. Now you set the page scale once and every measurement tool uses it automatically.
Favorited measurement tools now work on any drawing. Because scales used to be stored per drawing, a favorited measurement tool only measured correctly on the drawing it was created on. Now it measures at whatever scale the current page is set to, so it works everywhere.
You're prompted with a banner when you start measuring, rather than after your first measurement. Selecting a measurement tool shows a banner at the top of the screen so you can confirm or change the scale before you draw.
What is a page scale?
A page scale is the scale that applies to a whole page (or drawing). When a page has a scale set:
- Every measurement tool you use on that page measures at that scale automatically - you don't reselect a scale per measurement.
- The current scale is shown in the scale indicator at the bottom-left of the canvas.
- Changing the page scale updates every measurement on that page that uses the page scale.
A page can also be unscaled (a scale of 1:1, shown as 1:1 (Unscaled)). Measurements on an unscaled page are reported in page units at 1:1 until you set a real scale.
Each page starts unscaled and you can set the scale at any time (see below).
Starting a measurement: the scale banner
When you select a measurement tool - from the Measure tab of the toolbar, or a favorited measurement tool from the favorites bar - a banner appears at the top of the screen if the current page has no scale, so you can confirm the scale before you draw.
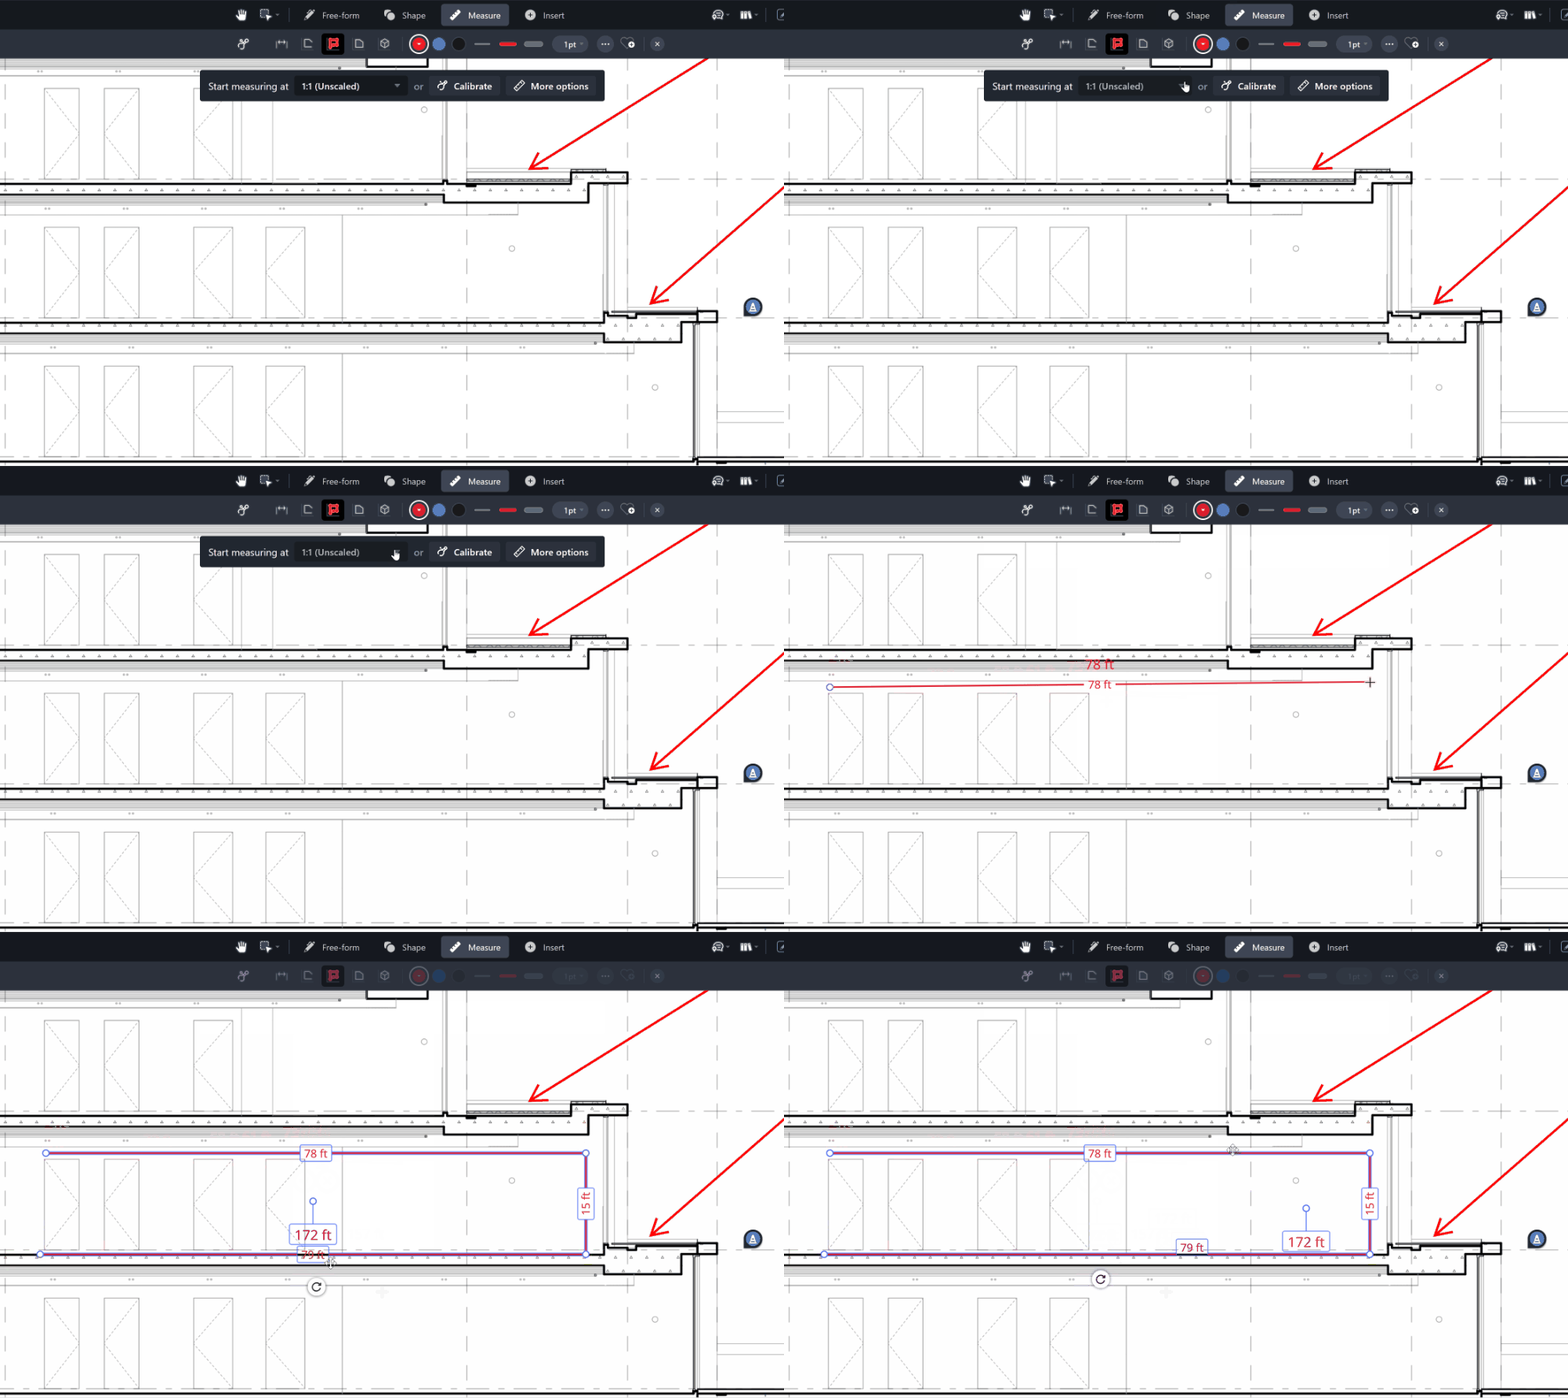
The banner shows what scale your first measurement will use and gives you three choices:
-
Scale dropdown: shows the scale that will be used if you just start drawing. This is the page's default scale, or 1:1 (Unscaled) if you've never chosen a default. Open it to pick a different scale (see The scale dropdown below).
-
Calibrate: jump straight into calibration to trace a known distance on the drawing (see Calibrating a page scale). When you finish calibrating, the measurement tool you started with is reselected automatically so you can keep going. If you cancel, you return to the banner with your tool still selected.
-
More options…: open the full Set page scale dialogue to choose a preset, enter a custom scale, set precision, and choose which pages the scale applies to (see Setting a page scale).
The banner disappears as soon as you start drawing your first measurement. If you don't need to change anything, just start measuring - your measurement uses the scale shown in the dropdown.
The scale dropdown
The dropdown is ordered to get you to the right scale quickly:
-
The current default (or 1:1 (Unscaled)) at the top - this is what you'll measure at if you don't change anything.
- Your 5 most recently used scales, so the scales you've been working with are one click away. (These are remembered on your device.)
-
All available preset scales, so you can pick a standard scale directly.
Setting a page scale
Open the Set page scale dialogue from More options… on the banner, or from the scale indicator at the bottom-left of the canvas (see The scale indicator). From here you can set the scale in three ways.
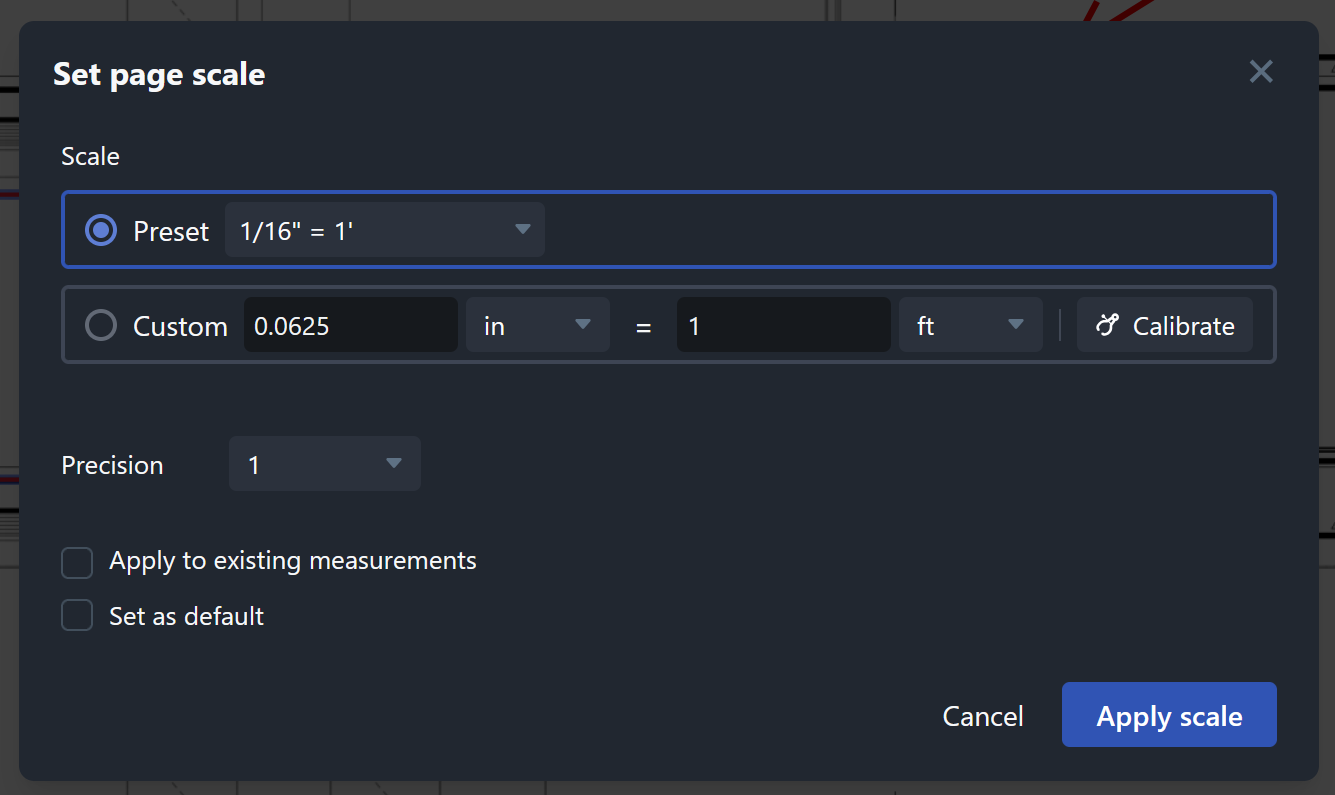
Choose a preset scale
Pick from the built-in list of common metric and fractional imperial scales. Start typing to jump straight to a scale - for example, typing 3/32 jumps to and selects 3/32" = 1'-0".
The preset list includes fractional imperial scales such as:
- 1/2" = 1'
- 3/8" = 1'
- 3/16" = 1'
Enter a custom scale
If you know the scale but it isn't in the list, enter it directly - for example 0.25 in = 1'-0". Custom scales are preserved and displayed exactly as you entered them: a scale of 1" = 1" always reads as 1" = 1" - it is never re-expressed in other units such as 1mm = 0.04in.
Calibrate from the drawing
Trace a known distance on the drawing and enter what it represents in real life - see Calibrating a page scale.
Precision and units
Choose the display units and precision for measurements taken at this scale (for example, 1/4" precision for imperial details, or 0.01 m for metric).
Apply the scale to one or more pages
When you set a scale you can choose where it applies:
-
This page (the button shows the current page number, e.g. This page (4))
- All pages
- A selected subset of pages
Set as your default for new drawings
Turn on Set as default for new drawings to have this scale pre-selected the next time you start measuring on a page that has no scale. You can clear your default at any time from Settings.
Calibrating a page scale
If the drawing's scale isn't in the title block or the preset list, calibrate it by tracing a distance you know. There's a dedicated Calibrate tool in the Measure tab of the toolbar, and you can also start calibration from the scale banner or the Set page scale dialogue.
- Select the Calibrate tool from the Measure tab of the toolbar (or choose Calibrate on the banner or in the Set page scale dialogue).
- Click or tap and drag along a known distance on the drawing (for example a dimension already printed on the sheet, such as a 300 mm or 15' length).
- Enter the physical distance that line represents (e.g.
1.5 m or 3' 4").
- Choose the display units and precision for measurements at this scale.
- Choose which pages to apply the scale to, and optionally set it as your default.
- Save. If you started from a measurement tool, that tool is reselected so you can carry on measuring.
The scale indicator
On any page that has a scale set, the current scale is shown in an indicator at the bottom-left of the canvas. It shows:
- The scale (e.g.
1:100, or 1" = 20'), and
- A graphic scale bar - a small labelled ruler that stays accurate as you zoom, giving you an at-a-glance sense of real-world distance.
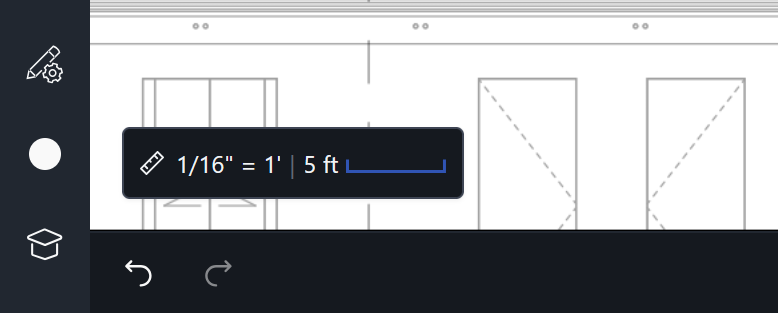
Unscaled pages: if the page is unscaled, the indicator reads 1:1 (Unscaled), with Unscaled shown in bold, so it's clear no real scale has been applied. If you deliberately choose a 1:1 scale (a conscious choice rather than the unscaled default), the indicator shows 1:1 without the "Unscaled" wording.
To change the scale, hover over and click or tap the indicator to open the Set page scale dialogue.
Changing a page scale later
You can update a page's scale at any time from the scale indicator. When you change it, all measurements on that page that use the page scale are recalculated to reflect the new scale - you don't need to redraw anything.
Taking Measurements
Taking Linear Measurements
- Select the Length tool
 from the Measure tab of the toolbar
- Select the appropriate scale from the Scale section of the tool panel
- Click or tap and drag on the canvas to take the measurement (hold Shift to constrain movement)
Taking Polylength Measurements
The Polylength tool traces a multi-segment path and displays the individual segment lengths and the total perimeter length.
- Select the Polylength tool
 from the Measure tab of the toolbar
- Select the appropriate scale from the Scale section of the tool panel
- Click or tap on the canvas to place the first point
- Click or tap to add further points along the polylength (hold Shift to constrain movement)
- Click or tap the final point to complete the measurement
Taking Perimeter Measurements
The Perimeter tool traces a multi-segment path and displays the total perimeter length. It works like the Poly Length tool but shows only the overall total - individual segment lengths are not displayed by default.
- Select the Perimeter tool
 from the Measure tab of the toolbar
- Select the appropriate scale from the Scale section of the tool panel
- Click or tap on the canvas to place the first point
- Click or tap to add further points along the perimeter (hold Shift to constrain movement)
- Click or tap the final point to complete the measurement
Taking Area Measurements
The Area tool measures both rectangular and polygonal areas - the drawing method determines the shape:
Rectangular area: Click or tap and drag on the canvas. Release to complete the rectangle.
Polygon area:
- Select the Area tool
 from the Measure tab of the toolbar
- Select the appropriate scale from the Scale section of the tool panel
- Click or tap on the canvas to place the first point
- Click or tap to add further points (hold Shift to constrain movement)
- Click or tap the origin point to close and complete the polygon
Note: Polygon vertices cannot cross through each other. The Area tool will prevent you from drawing invalid polygons.
Taking Volume Measurements
The Volume tool measures an area and reports its volume, based on a depth you set.
- Select the Volume tool from the Measure tab of the toolbar
- Confirm the scale shown in the banner (or set or calibrate it)
- Draw the shape as you would with the Area tool - click or tap and drag for a rectangle, or click or tap to place points and close the polygon
- Set the depth in the properties panel - the annotation displays the volume (area × depth)
Volume and Wall area
You can add a depth to a measurement to display a volume or a wall area:
- Add a depth to an area measurement (or use the Volume tool) to display its volume (the area multiplied by the depth).
- Add a depth to a length measurement to display a wall area (the length multiplied by the depth).
Set or change the depth in the properties panel with the tool or annotation selected, where you can also choose which values (area, volume, length, wall area, and so on) appear in the caption.
Customizing Measurement Captions
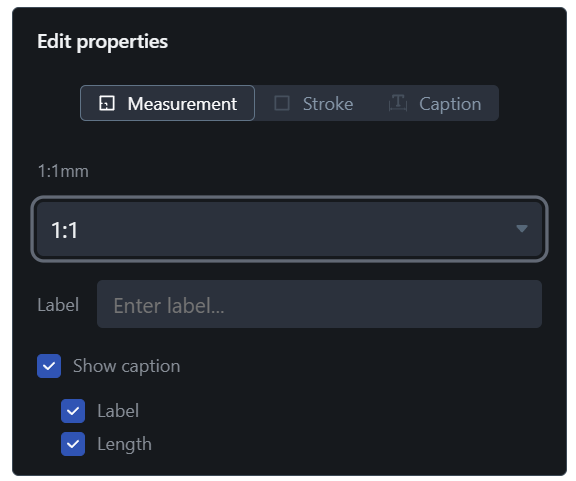
Each measurement annotation displays a caption - a block of information shown alongside the annotation on your drawing. You can control exactly what values appear in the caption and where it sits.
Choosing what to display
When a measurement is selected, the properties panel shows the display values available for that annotation type. Depending on the tool, these may include:
-
Label - a custom text string you type yourself
-
Length / Total length
- Area
- Perimeter
- Volume
-
Width / Height
- Wall area
-
Segment lengths (for Poly Length and Perimeter tools)
Toggle any value on or off independently. You can also turn off the entire caption block to display a clean annotation with no readout.
Tip: Perimeter vs Poly Length: These tools both trace multi-segment paths. The Poly Length tool shows both the individual segment lengths and the total. The Perimeter tool shows the total length only - segment labels are off by default but can be toggled on in the properties panel.
Showing or hiding segment captions

For multi-segment measurements (Poly Length, Perimeter), a separate toggle in the properties panel controls whether captions are shown on individual segments. Segment captions can either be displayed aligned to the segment, or horizontally aligned.
Moving a caption
Captions can be repositioned on the drawing:
-
iOS: Select an annotation, and tap the "Caption edit mode" button below the annotation, then drag captions.
-
Web: Select an annotation, then drag any caption to reposition it.
Tip: In the Web app, you can hold down the Shift key and drag captions without needing to select annotations.
This works for both the main caption and individual segment captions.
Resetting caption positions
To return all captions on a measurement to their default positions, right-click the annotation (or long-press on iOS) and choose Reset caption position.
Using Leader Lines
On Length annotations, you can add leader lines - perpendicular extensions at each end of the annotation that help separate the measurement line from dense areas of your drawing.
Adding leader lines
- Select a Length annotation
- A control point appears at each end of the annotation
- Drag a control point perpendicular to the annotation to extend the leader lines
Tip: Leader lines can only extend perpendicular to the annotation direction - they cannot be angled freely.
Removing leader lines
To remove leader lines and return the annotation to its default appearance, right-click the annotation and choose Reset extension length.
Using Subjects to Organize Measurements
Every measurement annotation has a Subject - a short text label describing what is being measured (for example, Concrete Walls or Roof Area). Subjects are used to group and summarize related measurements in the Markup List.
Default subject behavior
When you select a measurement tool, its subject is automatically set to the annotation type name (e.g. Length Measurement or Area Measurement). This resets each time you switch to a different tool and back.
Setting a custom subject for new annotations
While a tool is active, open the More… properties menu in the markup toolbar to set a custom subject. All annotations you place during that tool session will use the new subject.
Editing the subject on existing annotations
- Select one or more measurement annotations on the drawing
- Tap or click Edit subject in the selection bar
- Enter a new subject and confirm
Subjects and Favorites
When you save a tool to your Favorites, the current subject is saved with it. The next time you use that favorite, your custom subject is pre-loaded. When hovering over a favorited tool, the tooltip shows the saved subject instead of the default annotation type name.
Subjects in exported PDFs
During an unflattened export, the subject value is written to the exported PDF for all annotations, making it available in other PDF viewers and tools.
Adding Measurement Tools to the Favorites Bar
Measurement tools with preselected scales can be added to the favorites bar, but since Scales are stored per drawing, a favorited measurement tool will only work correctly and take correctly scaled measurements on the original drawing on which it was created.
Keyboard Shortcuts for Measurements
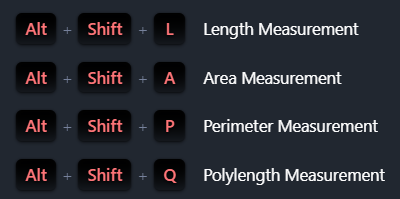
To make things easier, the Drawboard Projects Web app has a number of keyboard shortcuts that allow you to measure length and area on your drawings efficiently.