Available on: Web app, iOS app (Windows app coming soon)
Use the measurement tools to get accurate length and area measurements from your drawings, calibrating these to a specific scale if required.
Taking Measurements
Taking Linear Measurements
- Select the Length tool
 from the Measure tab of the toolbar
 - Select the appropriate scale from the Scale section of the tool panel
- Click or tap and drag on the canvas to take the measurement (hold Shift to constrain movement)
Taking Polylength Measurements
The Polylength tool traces a multi-segment path and displays the individual segment lengths and the total perimeter length.
- Select the Polylength tool
 from the Measure tab of the toolbar
 - Select the appropriate scale from the Scale section of the tool panel
- Click or tap on the canvas to place the first point
- Click or tap to add further points along the polylength (hold Shift to constrain movement)
- Click or tap the final point to complete the measurement
Taking Perimeter Measurements
The Perimeter tool traces a multi-segment path and displays the total perimeter length. It works like the Poly Length tool but shows only the overall total — individual segment lengths are not displayed by default.
- Select the Perimeter tool
 from the Measure tab of the toolbar
 - Select the appropriate scale from the Scale section of the tool panel
- Click or tap on the canvas to place the first point
- Click or tap to add further points along the perimeter (hold Shift to constrain movement)
- Click or tap the final point to complete the measurement
Taking Area Measurements
The Area tool measures both rectangular and polygonal areas — the drawing method determines the shape:
Rectangular area: Click or tap and drag on the canvas. Release to complete the rectangle.
Polygon area:
- Select the Area tool
 from the Measure tab of the toolbar
 - Select the appropriate scale from the Scale section of the tool panel
- Click or tap on the canvas to place the first point
- Click or tap to add further points (hold Shift to constrain movement)
- Click or tap the origin point to close and complete the polygon
Note: Polygon vertices cannot cross through each other. The Area tool will prevent you from drawing invalid polygons.
Customizing Measurement Captions
Each measurement annotation displays a caption — a block of information shown alongside the annotation on your drawing. You can control exactly what values appear in the caption and where it sits.
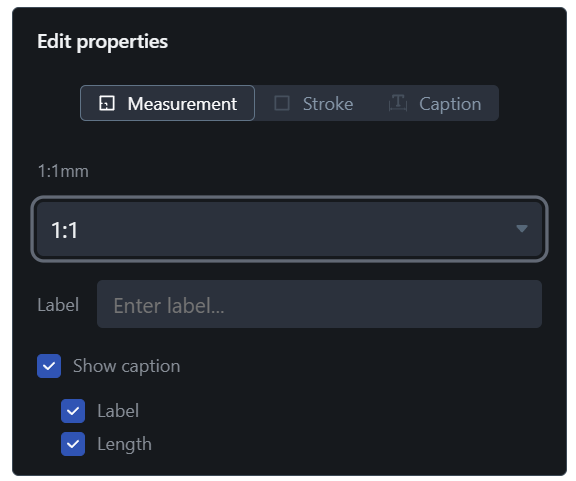
Choosing what to display
When a measurement is selected, the properties panel shows the display values available for that annotation type. Depending on the tool, these may include:
- Label — a custom text string you type yourself
- Length / Total length
- Area
- Perimeter
- Volume
- Width / Height
- Wall area
- Segment lengths (for Poly Length and Perimeter tools)
Toggle any value on or off independently. You can also turn off the entire caption block to display a clean annotation with no readout.
Tip: Perimeter vs Poly Length: These tools both trace multi-segment paths. The Poly Length tool shows both the individual segment lengths and the total. The Perimeter tool shows the total length only — segment labels are off by default but can be toggled on in the properties panel.
Showing or hiding segment captions

For multi-segment measurements (Poly Length, Perimeter), a separate toggle in the properties panel controls whether captions are shown on individual segments. Segment captions can either be displayed aligned to the segment, or horizontally aligned.
Moving a caption
Captions can be repositioned on the drawing:
- iOS: Select an annotation, and tap the "Caption edit mode" button below the annotation, then drag captions.
- Web: Select an annotation, then drag any caption to reposition it.
Tip: In the Web app, you can hold down the Shift key and drag captions without needing to select annotations.
This works for both the main caption and individual segment captions.
Resetting caption positions
To return all captions on a measurement to their default positions, right-click the annotation (or long-press on iOS) and choose Reset caption position.
Using Leader Lines
On Length annotations, you can add leader lines — perpendicular extensions at each end of the annotation that help separate the measurement line from dense areas of your drawing.
Adding leader lines
- Select a Length annotation
- A control point appears at each end of the annotation
- Drag a control point perpendicular to the annotation to extend the leader lines
Tip: Leader lines can only extend perpendicular to the annotation direction — they cannot be angled freely.
Removing leader lines
To remove leader lines and return the annotation to its default appearance, right-click the annotation and choose Reset extension length.
Using Subjects to Organize Measurements
Every measurement annotation has a Subject — a short text label describing what is being measured (for example, Concrete Walls or Roof Area). Subjects are used to group and summarize related measurements in the Markup List.
Default subject behavior
When you select a measurement tool, its subject is automatically set to the annotation type name (e.g. Length Measurement or Area Measurement). This resets each time you switch to a different tool and back.
Setting a custom subject for new annotations
While a tool is active, open the More… properties menu in the markup toolbar to set a custom subject. All annotations you place during that tool session will use the new subject.
Editing the subject on existing annotations
- Select one or more measurement annotations on the drawing
- Tap or click Edit subject in the selection bar
- Enter a new subject and confirm
Subjects and Favorites
When you save a tool to your Favorites, the current subject is saved with it. The next time you use that favorite, your custom subject is pre-loaded. When hovering over a favorited tool, the tooltip shows the saved subject instead of the default annotation type name.
Subjects in exported PDFs
During an unflattened export, the subject value is written to the exported PDF for all annotations, making it available in other PDF viewers and tools.
Adding Measurement Tools to the Favorites Bar
Measurement tools with preselected scales can be added to the favorites bar, but since Scales are stored per drawing, a favorited measurement tool will only work correctly and take correctly scaled measurements on the original drawing on which it was created.
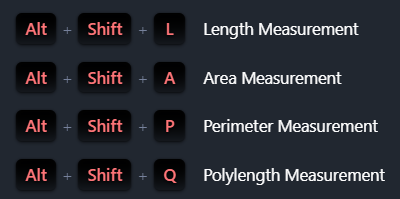
Keyboard Shortcuts for Measurements
To make things easier, the Drawboard Projects Web app has a number of keyboard shortcuts that allow you to measure length and area on your drawings efficiently.
Scales
Using Scales in Drawboard Projects
Drawboard Projects is used by customers to review drawings with sizes ranging from huge 6' x 12' engineering drawings all the way down to letter sized sheets.
The measuring tools in Projects need to be able to display accurate measurements for any drawing size, so we've made it easy to create and use scales to match drawing dimensions to real-world dimensions. Some of our customers use metric scales and others use fractional imperial scales, so we provide support for both.
Projects uses ratio scales (e.g. 1:200) where the number on the left of the colon represents 1 unit measurement on the page (e.g. 1mm or 1") and the number on the right of the colon represents how many times larger the real-life measurement is in the same measurement unit.
For example, a common metric ratio scale of 1:200 means 1mm on the drawing equals 200mm or 0.2m in real life. A common imperial scale of 1/16" on the drawing equalling 1' in real life is represented by a ratio scale of 1:192 (1/16" x 192 = 1').
Until a scale is created for a drawing, all measurements taken will use a default scale of 1:1.
Entering Common Scales
If you already know the scale of your drawing, you can start using the measurement tools by quickly creating a scale in Projects without having to use the calibration tool.
Tip: If you're using a fractional unit scale, this may be the easiest way to create your scale.
The tables below contain scales common within the engineering, civil and architectural fields. Each of these tables includes the scales expressed as both real world measurements and ratios.
Common Imperial Scales
| Scale | Display Unit | Precision | Typical Use |
|---|
| 1" = 80' | ft' in" | 1' | Location plans |
| 1" = 40' | ft' in" | 1' | Site plans |
| 1" = 20' | ft' in" | 1' | Site plans |
| 1/16" = 1' | ft' in" | 1' | Site plans |
| 1/8" = 1' | ft' in" | 1" | Floor plans, elevations, sections |
| 1/4" = 1' | ft' in" | 1" | Floor plans, elevations, sections |
| 3/4" = 1' | ft' in" | 1" | Room plans, interior elevations |
| 1" = 1' | ft' in" | 1/2" | Room plans, interior elevations |
| 1 1/2" = 1' | in" | 1/4" | Joinery details |
| 3" = 1' | in" | 1/8" | Details |
6" = 1'
(1/2 size) | in" | 1/8" | Details |
12" = 1'
(Full size) | in" | 1/16" | Details |
24" = 1'
(2x size) | in" | 1/16" | Details |
Common Metric Scales
| Scale | Display Unit | Precision | Typical Use |
|---|
| 1:5000 | Meters | 1m | Location plans |
| 1:1000 | Meters | 1m | Site plans |
| 1:500 | Meters | 0.1m | Site plans |
| 1:250 | Meters | 0.1m | Site plans |
| 1:200 | Meters | 0.1m | Floor plans, elevations, sections |
| 1:100 | Millimeters | 1mm | Floor plans, elevations, sections |
| 1:50 | Millimeters | 1mm | Room plans, interior elevations |
| 1:25 | Millimeters | 1mm | Room plans, interior elevations |
| 1:20 | Millimeters | 1mm | Joinery details |
| 1:10 | Millimeters | 0.1mm | Details |
| 1:5 | Millimeters | 0.1mm | Details |
| 1:2 | Millimeters | 0.1mm | Details |
| 1:1 | Millimeters | 0.01mm | Details |
| 2:1 | Millimeters | 0.01mm | Details |
Tip: If you're using a fractional unit scale, this may be the easiest way to create your scale.
Creating Custom Scales:
Tip: In the Web app, ignore the Physical distance field when directly entering a scale
- Select a measurement tool (Length, Perimeter, Polylength or Area, from the Measure tab of the tool bar)
- In the Web app, in the Scale section at the bottom of the tool panel, click or tap the Add or New button. In the iOS app, tap the Add new scale button at the top of the tool panel
- Enter the appropriate ratio scale into the Ratio fields
- In the Web app, the two Ratio fields are at the bottom of the "Create scale" panel that appears
- E.g. to enter the metric scale 1:200, enter 1 in the left field and 200 in the right field
- E.g. to enter the imperial scale 1/16"=1', first look up the ratio scale in the Common Imperial Scales table above (1:192), then enter 1 in the left field and 192 in the right field
- In the iOS app, the two Ratio fields are at the bottom of the "Add new scale" dialogue that appears
- E.g. to enter the metric scale 1:200, enter 1 in the left field and 200 in the right field
- E.g. to enter the imperial scale 1/16"=1', first look up the ratio scale in the Common Imperial Scales table above (1:192), then enter 1 in the left field and 192 in the right field
- Select which Units you wish to display on the drawing when measurements are taken using this scale (e.g. selecting Fractional feet and inches will display any measurement taken on the drawing with this scale in a 1' 4" format)
- Select the Precision you wish to take measurements with using this scale (e.g. if you wish to be able to take a metric measurement like 8.75m, select 0.01. If you wish to be able to take an imperial measurement like 30' 9 3/4", select 1/4")
- Change the Scale title if you wish to make it more meaningful, or leave the default (includes the calibrated page ratio and the name of the team member who created the scale)
- Click or tap Save to save this scale and begin taking measurements using the measurement tool
- Once your scale has been created, it will then be available in the Scale list for that drawing, for everyone on the project to use for any measurement annotations (so make sure it is calibrated correctly and labelled well!)
Editing Scales
Any team member who is a Collaborator is able to edit scales. Editing a scale will update any measurements that have been taken on the document using that scale to reflect the new values. Scales cannot be deleted.
Tip: Editing a scale changes this scale for all team members taking measurements on this drawing, so be careful!
Calibrating Measurement Scales from a Drawing
If the scale of the drawing is not listed in the title block, a scale can be created using Calibration, so that scaled measurements can be taken accurately.
- Select any tool from the Measure tab of the toolbar
- Navigate to the edit properties section and click the "+" button to add a new scale
- Click the Scale section and press Calibrate
- Click or tap and drag on the canvas to trace a known measurement shown on the drawing (e.g. a 300mm or 15' length already shown on the drawing)
- Enter the Physical Distance that this measurement represents (e.g. 1.5m or 3' 4")
- If the physical distance is in decimal units, select a decimal Unit; if fractional, select a fractional Unit
- Select which Units you wish to display for measurements taken with this scale
- Select the Precision you wish to take measurements with
- In the Web app, the Ratio fields will be calculated automatically. In the iOS app, the ratio will only be shown in the Name
- Change the Scale title if desired, or leave the default
- Click or tap Save (on iOS tap Add)
Once your scale has been created, it will then be available in the Scale list for that drawing, for everyone on the project to use for any measurement annotations (so make sure it is calibrated correctly and labelled well!)
Tip: In the Web app, ignore the Ratio fields when using the Calibrate tool