The Markup Toolbar is now available on Windows! Sitting at the top of your canvas, it gives you a comprehensive, always-visible way to access every tool in Drawboard PDF without any prior setup. While your Favourites bar remains the go-to place for your most-used tools, this article walks you through how the Markup Toolbar is organised, how to customise it, and how to get the most out of it on Windows.
In this article
- Accessing the Markup Toolbar
- How tools are organised
- Customising tool properties
- Pinning tool properties to the right-hand panel
- Switching between docked and floating modes
- Collapsing and moving the Favourites Toolbar
- The redesigned app settings
Accessing the Markup Toolbar
The Markup Toolbar appears at the top of your canvas whenever you open a document. If you don't see it, you can re-enable it in a couple of steps:
- Click the tools icon
 at the bottom of the left-hand side menu.
- Toggle Markup Toolbar on.
Note: When the Markup Toolbar is enabled, the pan and rectangle select tools move from the Favourites Toolbar into the Markup Toolbar.
How tools are organised
Every tool in Drawboard PDF is accessible directly from the Markup Toolbar, grouped into the following categories:
|
Pan
|
Rectangle select
- Rectangle select
[V]
- Lasso select
[Shift + O]
- Text select
[Shift + T]
- Laser pointer
[Ctrl + L]
- Snapshot
[Ctrl + G]
- Eraser
[E]
|
|
Free-form
- Pen
[P]
- Highlighter
[H]
- Laser pointer
[Ctrl + L]
- Tape
|
Shapes
- Rectangle
[R]
- Ellipse
[O]
- Line
[L]
- Arrow
[A]
- Polyline
[Shift + N]
- Polygon
[Shift + P]
- Cloud
[C]
|
|
Review
- Text
[T]
- Callout
[Q]
- Text highlight
- Underline
- Squiggle
- Strikethrough
- Text cleaner
- Redaction
|
Measure
- Calibrate
- Measure length
[Shift + Alt + L]
- Polylength
[Shift + Alt + Q]
- Rectangle area
[Shift + Alt + R]
- Polygon area
[Shift + Alt + P]
|
|
Insert
- Note
[N]
- Bookmark
- Image from camera
- Image from file
[I]
- Hyperlink
[Shift + H]
- Audio Note
- Equation
- Snapshot
[Ctrl + G]
- Signature
|
Markup Library
- Access all saved and shared markup templates from one place.
|
Customising tool properties
Once a tool is selected, you can adjust its properties directly from the Markup Toolbar. There are three levels of customisation available:

Quick presets
Colour swatches and thickness options for the active tool are shown in the toolbar. Click any preset to apply it instantly. Use the dropdown on the colour or thickness option to access the full palette or all available thickness settings.
Advanced properties
Select your tool, then click More options (···) in the toolbar. A full properties panel will open where you can adjust opacity, fill colour, line style, font settings, and more.
Add to Favourites
Once you've set up a tool exactly how you like it, click Add to Favourites to save it to your Favourites Toolbar for quick reuse.
Pinning tool properties to the right-hand panel
You can pin the tool properties panel to the right-hand side of your screen so it stays visible while you annotate. Any tool selected from either the Markup Toolbar or the Favourites Toolbar will display its properties there. You can resize the panel at any time by dragging its edge.
Note: Annotation properties don't yet appear in the right-hand panel. This is something the team is actively working on and will be available in a future update.
Switching between docked and floating modes
The Markup Toolbar can be repositioned to suit your workspace. To switch modes, open app settings from the bottom-left corner of the canvas or right-click anywhere on the Markup Toolbar and select your preferred layout from the chevron menu next to the toolbar label.

Docked mode
In docked mode, the toolbar is fixed to the top of the canvas. Choose between two display options:
|
Two-row (default)
Category tabs appear on the first row. Selecting a category reveals its tools on the second row, and selecting a tool displays its properties inline.
|
Single row
The toolbar condenses into one row, shifting content to the left to give you more canvas space. The toolbar menu moves to the far right.
|
Floating mode
In floating mode, toolbar components like categories, tools, and tool properties are stacked together at the top by default. You can drag each component independently to reposition it; a green highlight shows where it can be dropped.

You can also choose from three preset layouts:
|
Stacked (default)
All components grouped together at the top of the canvas.
|
Stacked, properties separated
Categories and tools stay grouped; the properties panel moves independently.
|
Combined single row
Everything in one compact row for maximum canvas space.
|
Tip: You can always access toolbar settings by right-clicking any part of the Markup Toolbar.
Collapsing and moving the Favourites Toolbar
Need more canvas space? You can collapse the Favourites Toolbar into a compact indicator and reposition it anywhere on screen:
- Click the Drawboard logo
 at the bottom of the Favourites Toolbar to collapse it.
- The collapsed toolbar shows your currently active tool. If the Pan tool is selected, only the Drawboard logo is displayed.
- Drag the collapsed toolbar to any available anchor point around the canvas (highlighted in green).
- To expand it again, click the logo to toggle it back on.
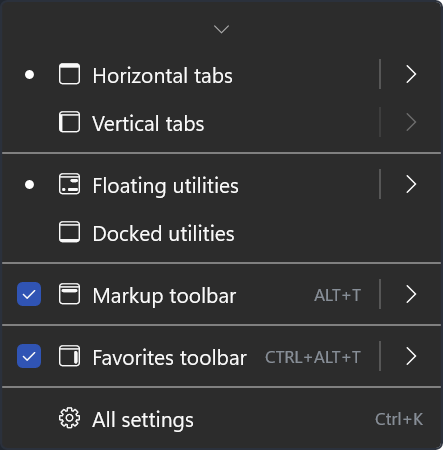
The redesigned app settings
Alongside the Markup Toolbar update, the app settings have been fully redesigned with more customisation options in one place. Here's what's available:
Horizontal and vertical tabs
This controls the left-hand side menu, which houses your pages panel, bookmarks, and annotation history.
|
Horizontal tabs (default)
Document tabs appear at the top. A chrome button in the top-left lets you hide the bars:
-
Toggle mode — hides both bars at once.
-
Cycle mode — hides the top bar first, then the left bar on the next click.
|
Vertical tabs
Document tabs move to the left-hand side, the top bar is removed entirely, and your profile, upload, and share controls consolidate into the left-hand menu.
|

Floating and docked utilities
The utilities bar includes navigation history, undo/redo, the page indicator, and zoom controls. By default these float around the canvas. You can:
- Toggle individual utilities on or off to reclaim canvas space.
- Switch to docked utilities to consolidate all controls into a single bar at the bottom of the canvas.
