Available on: Web app, iOS app
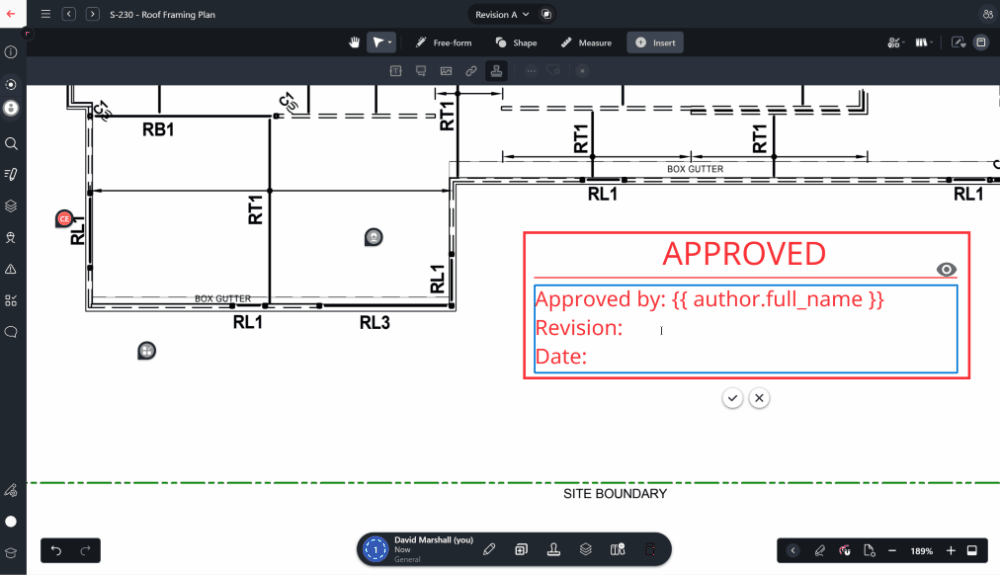
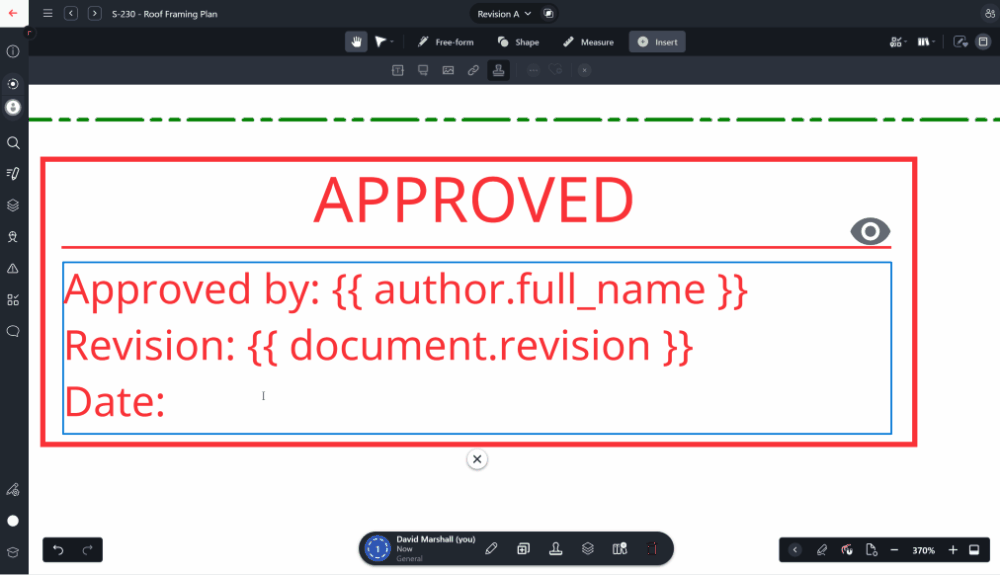
Drawboard Projects now supports Dynamic Tokens in text annotations within your stamps and saved markups (Markup Library). This powerful feature allows you to insert placeholders that automatically populate with relevant information (such as dates, user names, or project details) when the stamp or markup is placed on a drawing. Create dynamic stamps and markups that you can use to quickly mark approvals, rejections or review finalizations.
What are Dynamic Tokens?
Dynamic Tokens are text placeholders that are replaced with specific, real-time information when your stamp or saved markup is applied to a drawing. This eliminates the need to manually update critical information every time you use a saved element.
For example, if you create a "Reviewed" stamp, you can insert a Dynamic Token for the current date and the user's name. When any user places that stamp, the tokens will instantly display:
Complete list of available Dynamic Tokens
The following table lists all available Dynamic Tokens, organized by the type of information they retrieve. These tokens can be inserted into any text annotation for use within your stamps and saved markups:
| Dynamic Token | Example Output | Description |
|---|
| author.first_name | Giorgio | First name of the user inserting the stamp/markup |
| author.last_name | Bianchi | Last name of the user inserting the stamp/markup |
| author.full_name | Giorgio Bianchi | Full name of the user inserting the stamp/markup |
| author.initials | GB | Initials of the user inserting the stamp/markup |
| author.email | giorgio@example.com | Email address of the user inserting the stamp/markup |
| author.title | Senior Engineer | Title of the user inserting the stamp/markup (set in user profile) |
| author.organization_name | ACME Engineering | Name of the Organization that the user inserting the stamp/markup belongs to |
| document.name | Area 103 Floor Plan | The name of the target drawing or document |
| document.number | A1.103 | The number of the target drawing or document |
| document.revision | F | The current revision of the target drawing or document |
| document.discipline | Architecture | The discipline of the target drawing (blank if used on a document) |
| project.name | 1384 - Pine Resort | The name of the parent project |
| date | Nov 18, 2025 | The date when the stamp/markup was inserted |
Note: When inserting a Dynamic Token, both {{ author.email}} and {{author.email}} formats work. Also, the Dynamic Tokens that begin with document. are used for both drawings and documents. Typing drawing.name will not work.
How to Insert Dynamic Tokens
You can insert Dynamic Tokens into a text annotation when you are creating or editing a stamp or a saved markup in your Markup Library.
Add a text annotation: Select the text annotation tool and add a text annotation.
Type the Trigger: When inside the text box, simply type two opening curly braces {{.
Select from the List: In the Web app, a list of available tokens will appear, organized by category (e.g., Author, Document, Date/Time). You can browse the list and click on the token you want to insert.
Type Directly (Optional): If you already know the token name, you can bypass the menu and type the full token directly (e.g., {{author.full_name}} ). In the iOS app, no list will appear, but you can still type the token name directly.
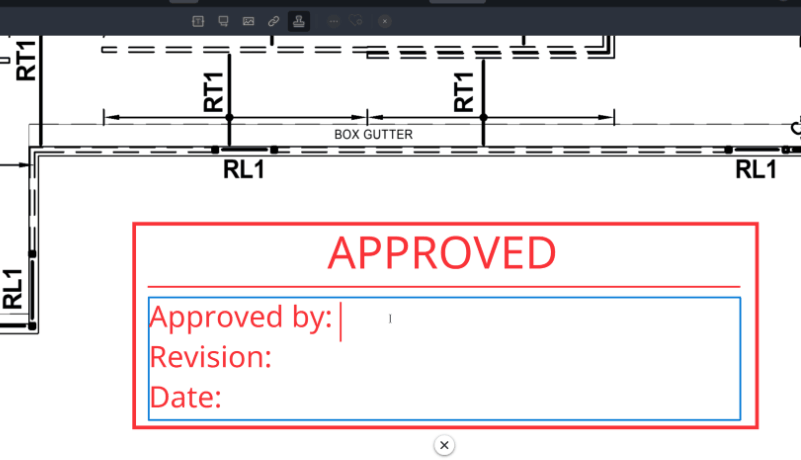
Preview the Output: Hovering over the eye icon  just above the text field will show you a preview of the Dynamic Token output
Date and time token customization
Date and Time tokens are especially flexible, allowing you to choose how the information is formatted.
When inserting a Date or Time token, you have the option to use one of our preformatted styles or create a fully customized display format using the formatDate property.
1. Preformatted date options
These options provide standard, easy-to-use formatting:
| Preformatted Option | Example Output | Description |
|---|
| Date: Full Text | November 7, 2025 | Displays the full month name, day, and year. |
| Date & Time: US | 11/7/2025 2:17 PM | US-style month/day/year with 12-hour time. |
| Date & Time: Intl. | 7/11/2025 2:18 PM | International-style day/month/year with 24-hour time. |
2. Custom date formatting
If the preformatted options don't meet your needs, you can customize the display of the date/time using the formatDate property.
The custom format string uses a series of tokens for individual date and time elements. You specify the desired format using a combination of characters (e.g., DD/MM/YYYY).
For example, to display a date as Mon, 18 Nov, 2025, you would use the format string: {{ date | formatDate: "ddd, DD MMM, YYYY" }}.
The following table lists all the available date formatting options that can be used inside the formatDate string:
| Format Token | Output (Example) | Description |
|---|
YY | 25 | Two-digit year |
YYYY | 2025 | Four-digit year |
M | 1-12 | The month, beginning at 1 |
MM | 01-12 | The month, 2-digits |
MMM | Jan-Dec | The abbreviated month name |
MMMM | January-December | The full month name |
D | 1-31 | The day of the month |
DD | 01-31 | The day of the month, 2-digits |
d | 0-6 | Day of the week (Sunday is 0) |
dd | Su-Sa | Min name of the day of the week |
ddd | Sun-Sat | Short name of the day of the week |
dddd | Sunday-Saturday | Full name of the day of the week |
H | 0-23 | The hour (24-hour clock) |
HH | 00-23 | The hour, 2-digits (24-hour clock) |
h | 1-12 | The hour (12-hour clock) |
hh | 01-12 | The hour, 2-digits (12-hour clock) |
m | 0-59 | The minute |
mm | 00-59 | The minute, 2-digits |
s | 0-59 | The second |
ss | 00-59 | The second, 2-digits |
SSS | 000-999 | The millisecond, 3-digits |
Z | +05:00 | The offset from UTC, ±HH:mm |
ZZ | +0500 | The offset from UTC, ±HHmm |
A | AM PM | Uppercase meridiem |
a | am pm | Lowercase meridiem |
How to use Dynamic Tokens in a new stamp or saved markup

When creating a new stamp or saved markup in the Markup Library, you can use any combination of our standard markup tools (lines, shapes, cloud, etc.) to design the element's format.
Design the Layout: Use tools like the Rectangle and Line tools to create the borders and structure of your stamp or markup.
Add Text Annotations: Use the Text Annotation tool for any content you want inside the stamp.
Insert Tokens: Wherever you want details to be dynamically replaced upon placement—such as the revision number, the reviewer's name, or the date of inspection—insert a Dynamic Token using the {{ trigger within the text box (see instructions above).
Save the Stamp or Markup: Once complete, select all the markups you with to save, and then use one of the buttons on the Selection Bar at the bottom of the screen to save the selected markups as either a new stamp or a saved markup in your Markup Library.