Introducing the Markup Toolbar, now available on the Drawboard PDF app for iOS & Mac. This new feature for iPhone, iPad, and Mac provides a quick and intuitive way to access all markup tools directly from the top of your document canvas. While all tools remain accessible via your personalized Favorites bar, the Markup Toolbar offers a comprehensive and always visible alternative to streamline your workflow.
In this article, we'll show you:
How to access tools via the Markup toolbar
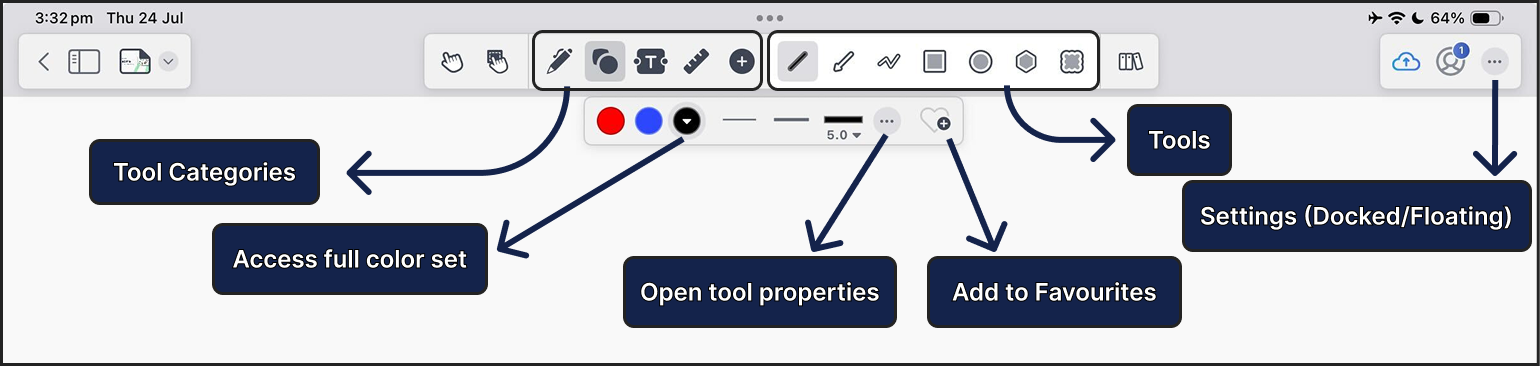
All of the Drawboard PDF tools are conveniently located in the Markup Toolbar. Here is how they are organized:
1. Navigation & Selection: The Pan and Select tools are always visible on the toolbar.
2. Tool Categories: All other tools are grouped into categories. Click on a category to see the tools inside:
-
Free-form
 - includes Pen, Highlighter, Eraser and Laser Pen tools
-
Shape
 - includes Line, Arrow, Polyline, Rectangle, Ellipse, Polygon and Cloud tools
-
Review
 - includes Text, Callout, Text highlight, Underline, Squiggle, Strikethrough, Text Removal, Redaction and Text Redaction tools
-
Measure
 - includes Measure Length, Poly length, Polygon area, Rectangle area and Calibrate tools
-
Insert
 - includes Image, Bookmark, Hyperlink, Signature, Audio and Note tools
3. Markup Library  : The Library is your personal collection of saved markups, allowing you to store any annotation and reuse it instantly across your documents.
Customizing your tool properties
After selecting a tool, you can easily customize its properties like color, thickness, and opacity directly from the Markup Toolbar. Here’s how to access the different levels of customization:
1. Using Quick Presets
For maximum speed, the toolbar displays several preset color swatches and thickness options for the selected tool. Simply click one of these presets to apply it instantly.
2. Accessing the Full Palettes
If you need more choice than the presets offer:
- Click the dropdown arrow next to the color swatches to open the full color palette.
- Click the dropdown arrow next to the thickness lines to view the complete thickness menu.
3. Opening the Advanced Properties Menu
To access all properties for a tool, ensure that the tool is selected and then tap the  more options in the Markup toolbar. This will open the full tool properties menu, where you can fine-tune advanced settings such as Opacity, Fill Color, Line Style, Font Settings, and many more.
Hiding and Showing the Markup and Favorites Toolbars
You have full control over which toolbars are visible on your canvas.
To show or hide a toolbar:
- Tap the the
 three dots located in the top-right corner.
- In the menu, you will see toggle switches next to Markup Toolbar and Favorites Toolbar.
- Tap the toggle to switch a toolbar ON (visible) or OFF (hidden).

✏️ Important Note on Adding Favorites:
When you are using the markup toolbar, you can only add new tools to your Favorites Toolbar from the  Add to Favourites button in the Markup Toolbar.
Switching Between Docked and Floating Toolbars
The Markup Toolbar can be displayed in two different modes to best suit your workflow: a fixed Docked mode or a movable Floating mode.
To change the viewing mode:
- Access the menu by tapping three dots on the top right corner
- Under the "Viewing Mode" section, select either Docked or Floating.
Floating Mode (Default)
Selecting this mode detaches the toolbar from its docked position, allowing you to move it freely around your canvas. You can drag and place it anywhere you like, which is perfect for maximizing your view of the document or for keeping your tools right next to the area you are working on.
💡 Important note: The Floating Mode feature is not available on the Mac version of our app.
Docked Mode
In this mode, the Markup Toolbar is fixed to its default position at the top of your screen. This provides a stable and predictable location for all your tools, ensuring they are always in the same place when you need them.

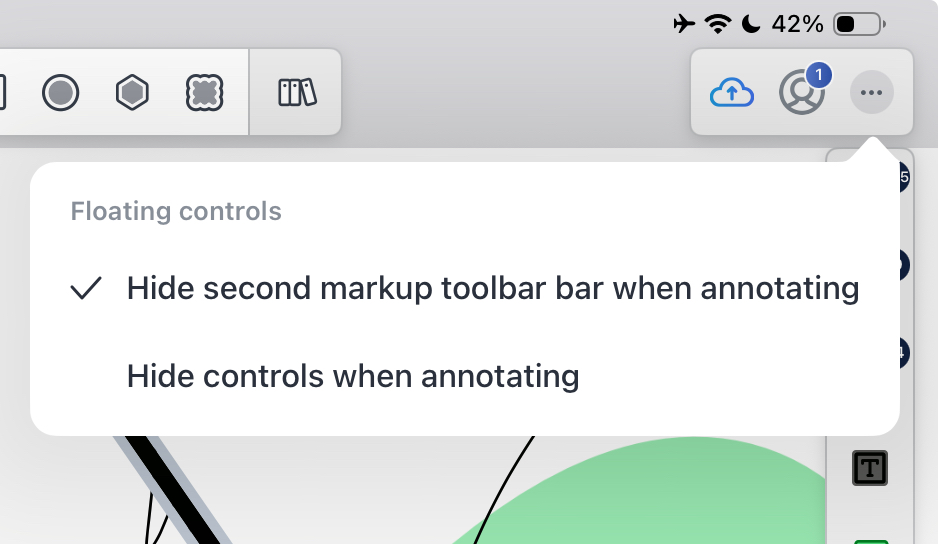
Customizing Floating Toolbar Behavior
To create a more immersive and distraction-free experience, you can control whether the floating toolbars automatically hide while you are actively drawing or writing.
To access these controls:
- First, ensure your toolbar is set to Floating mode.
- Tap the the three dots on the top right corner
- Then click more options...
In the menu, you will find the following controls:
Hide Markup Toolbar While Drawing
The entire floating toolbar will fade away while you are writing or drawing, leaving you with an unobstructed canvas.
Hide Properties While Drawing
When this is enabled, the secondary Tool Properties bar (which shows color, thickness, opacity, etc.) will temporarily disappear the moment you start drawing.
💡 Pro Tip: What to do if your toolbar is completely hidden?
Just look for the small, collapsed version of the toolbar floating on your canvas, it will look like a small button. Tap on it once, and your full toolbar will instantly reappear.
FAQs
Can I still use Favorites?
Yes. You can show and hide the favorites toolbar by tapping the favorites toolbar icon at the right of the Markup toolbar or by tapping the tools icon near the bottom of the left hand side menu.
Can I add tools to the Markup toolbar?
The Markup toolbar is designed for one-time use of each tool. While you can't add additional tools to the Markup toolbar, you can add tools to your favorites toolbar. Users on Drawboard PDF Pro can add unlimited tools to their favorites toolbar while users on Drawboard PDF Basic can add 7 tools.